vRealize Automation 7.3 and NSX – Micro-segmentation strategies

 vRealize Automation and NSX integration has introduced the ability to deploy multi-tiered applications with network services included. The current integration also enables a method to deploy micro-segmentation out of the box, based on dynamic Security Group membership and the Service Composer. This method does have some limitations, and can be inflexible for the on-going management of deployed applications. It requires in-depth knowledge and understanding of NSX and the Distributed Firewall, as well as access to the Networking and Security manager that is hosted by vCenter Server.
For customers who have deployed a private cloud solution using vRealize Automation, an alternative is to develop a “Firewall-as-a-Service” approach, using automation to allow authorised end users to configure micro-segmentation. This can be highly flexible, and allow the delegation of firewall management to the application owners who have intimate knowledge of the application. There are disadvantages to this approach, including significantly increased effort to author and maintain the automation workflows.
This blog post describes two possible micro-segmentation strategies for vRealize Automation with NSX and compares the two approaches against a common set of requirements.
This post was written based on the following software versions
<td width="422">
  <strong>Version (Build)</strong>
</td>
<td width="422">
  7.3 (5604410)
</td>
<td width="422">
  6.3.5 (7119875) - 6.4
</td>
<td width="422">
  6.5 Update 1d (7312210)
</td>
<td width="422">
  6.5 Update 1 (5969303)
</td>
These are some generic considerations when deploying micro-segmentation with vRealize Automation.
- An application blueprint is designed to be deployed multiple times from vRealize Automation, the automation shouldn’t break any micro-segmentation or firewall policy when that happens.
- vRealize Automation blueprints can scale in and out – this should be accommodated within the micro-segmentation strategy to ensure that required micro-segmentation is the same as implemented micro-segmentation.
- vRealize Automation is a shared platform, so the micro-segmentation of one deployment should be limited in scope, but should also consider intra-deployment communications between applications, for example, of the same business group or tenant.
Application XYZ requirements
For illustration purposes, an example 3-tier application deployment is shown below “Application XYZ”. It consists of a Web, App and DB tier and a load balancer for the Web and App tiers.
The communication required for the application to function correctly is defined in the table below. To achieve micro-segmentation, there is a default “deny all” rule at the bottom. This ensures that any traffic not explicitly allowed by the other rules, is denied. The application end users must be specifically allowed access to the front-end Web Load Balancer. There is also a set of infrastructure or global rules that will be applied to each server, allowing access to infrastructure services such as DNS, NTP and software repositories, as well as allowing administrator access to the servers.
<td width="132">
  <strong>Source</strong>
</td>

<td width="138">
  <strong>Destination</strong>
</td>

<td width="145">
  <strong>Protocol/Port</strong>
</td>

<td width="120">
  <strong>Action</strong>
</td>
<td width="132">
  XYZ Servers
</td>

<td width="138">
  DNS, NTP, Yum
</td>

<td width="145">
  DNS, NTP, HTTPS
</td>

<td width="120">
  Allow
</td>
<td width="132">
  Administrators
</td>

<td width="138">
  XYZ Servers
</td>

<td width="145">
  SSH
</td>

<td width="120">
  Allow
</td>
<td width="132">
  XYZ Users
</td>

<td width="138">
  Web LB
</td>

<td width="145">
  80
</td>

<td width="120">
  Allow
</td>
<td width="132">
  Web LB
</td>

<td width="138">
  Web Servers
</td>

<td width="145">
  80
</td>

<td width="120">
  Allow
</td>
<td width="132">
  Web Servers
</td>

<td width="138">
  App LB
</td>

<td width="145">
  8080
</td>

<td width="120">
  Allow
</td>
<td width="132">
  App LB
</td>

<td width="138">
  App Servers
</td>

<td width="145">
  8080
</td>

<td width="120">
  Allow
</td>
<td width="132">
  App Servers
</td>

<td width="138">
  DB Server
</td>

<td width="145">
  3306
</td>

<td width="120">
  Allow
</td>
<td width="132">
  Any
</td>

<td width="138">
  Any
</td>

<td width="145">
  Any
</td>

<td width="120">
  Deny
</td>
In my examples below, the application is deployed with an on-demand routed network that is backed by an NSX Logical Switch, however it should be noted that the underlying network will not affect the micro-segmentation strategy. This can be implemented on existing VLAN backed networks, on multiple routed or NAT networks within a single deployment.
Out-of-the-box micro-segmentation with vRealize Automation
Configuring micro-segmentation to be deployed as part of a blueprint and using the existing vRealize Automation integration requires the use of pre-created Security Groups and Security Policies. If an application’s network rules are well known at authoring time, is unlikely to need to be changed, and is likely to be deployed many times, this method may be a good fit.
Because this method pre-defines the micro-segmentation for an application, it has the advantage of being able to be pre-approved by a security team (if required) before being published.
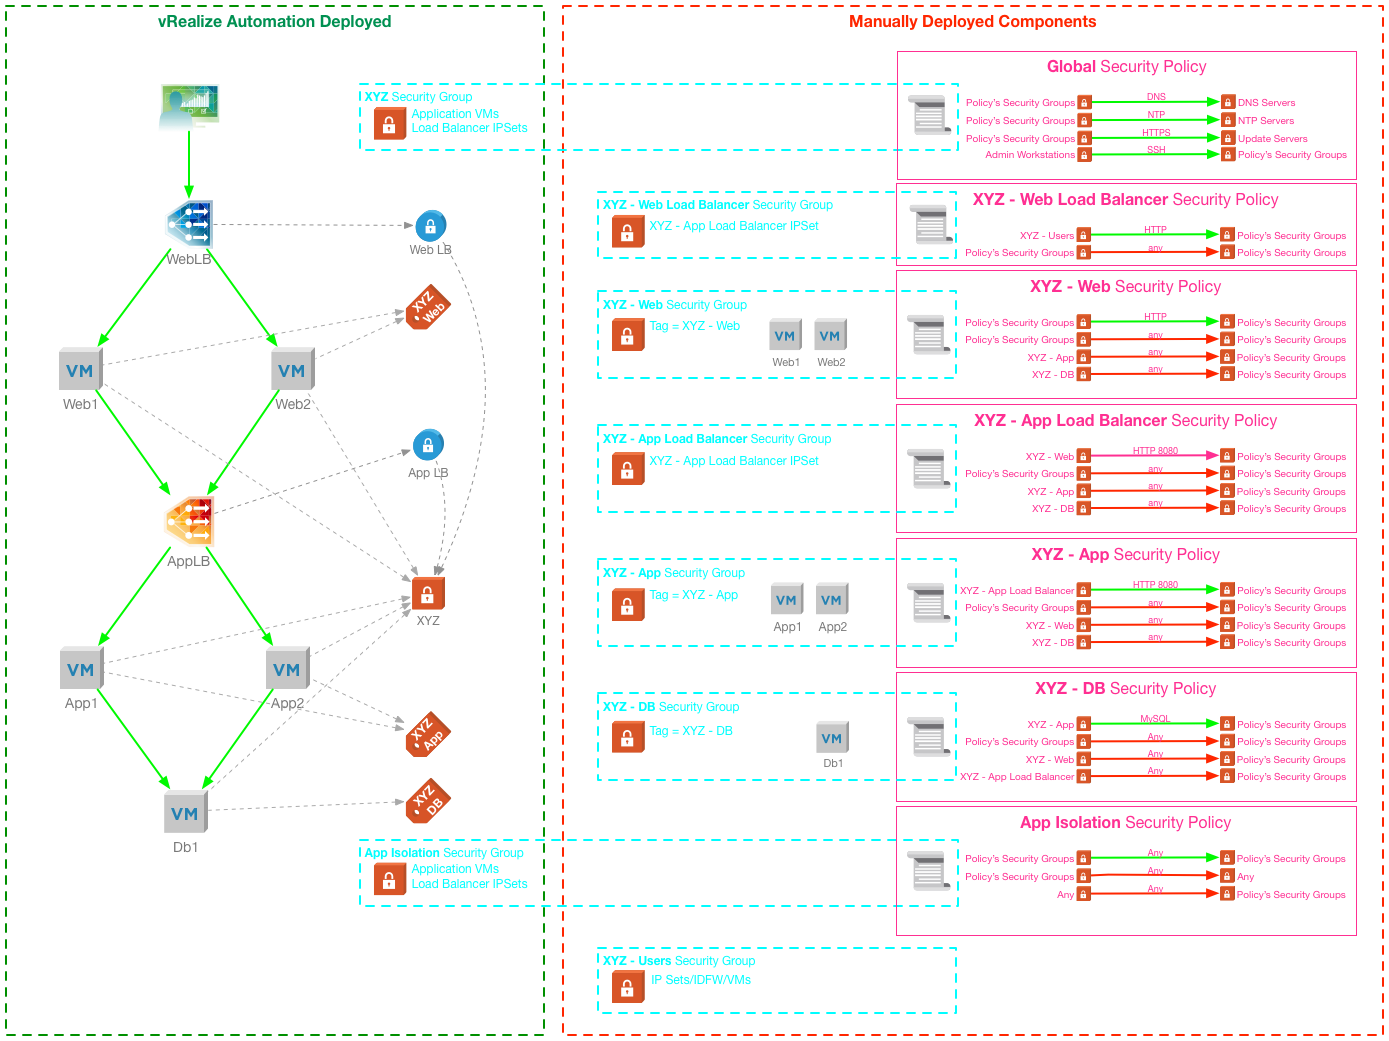
The diagram below, visualizes the strategy that will be employed to meet the micro-segmentation requirements for this particular application when deployed by vRealize Automation using out-of-the-box integration only.

Implementing with “out-of-the-box” NSX integration
Based on the out-of-the-box integration with NSX, vRealize Automation can deploy the three tiers connected to a single on-demand routed network, with the load balancer contexts on a single ESG. On top of that we can attach an on-demand Security Group (to provide the unique “deployment Security Group”) which is associated with the Global Security Policy (providing the “birth-right” infrastructure rules for VMs). We can also tag the VM tiers with existing Security Tags, allowing dynamic inclusion into tier-specific security groups.
There is no out-of-the-box method to control access to the Load Balancer IPs – you cannot apply Security Tags or Groups to the Load Balancer using the Blueprint Designer. When you create an On-demand Security Group, vRealize Automation will place the Load Balancer’s IP address into a IPSet – however there is no way to add these IPSets to the Security Policies dynamically. This means that manual intervention, or automation post deployment, is required to add the IPSet to the correct load balancer.
The following settings and components must be pre-created:
- The Security Policies Global Setting must be set to apply the firewall rules to “Policy’s Security Groups”
- A Security Group for each application tier
- A Security Tag for each application tier (excluding load balancers)
- A Security Policy for each application tier
Configure Security Tags and Groups
The Security Tags and Groups to manage the intra-tier communication must be pre-created prior to deploying the blueprint. The application tier Security Groups dynamically include the relevant Security Tag.
The Load Balancer Security Groups shown below will be used later to identify the Load Balancer VIPs.
Configure Security Policies
A Security Policy with Firewall Rules defined for each application tier needs to be created, to control the traffic between application tiers.
The order that the Security Policies are configured is important, as the firewall rules of lower ranked policies will be processed before higher ranked ones.
The XYZ – Web Load Balancer Security Policy is applied to the XYZ – Web Load Balancer Security Group, and implements a single firewall rule to allow the XYZ Users Security Group to access the Web Load Balancer VIP over HTTP.
The XYZ – Web Tier Security Policy is applied to the XYZ – Web Tier Security Group and configures four firewall rules:
- Allow the XYZ – App Load Balancer and XYZ – Web Load Balancer Security Groups to access the web tier over HTTP
- Deny all intra-tier communication for the Web tier
- Deny all inter-tier communication from the App and DB tiers
Note: Communication from the NSX Edge hosting the load balanced VIPs will always be from the primary IP address, in this case the App Load Balancer VIP. Because of this, rules allowing access from the load balancers must be configured to allow communication from XYZ – App Load Balancer.
The XYZ – App Load Balancer Security Policy applies to the XYZ – App Load Balancer Security Group and configures four firewall rules:
- Allow the XYZ – Web Security Group to access the App Load Balancer VIP over HTTP 8080
- Deny all communication from the XYZ – Web Load Balancer Security Group
- Deny all communication from the XYZ – App and XYZ – DB tiers
The XYZ – App Security Policy applies to the XYZ – App Security Group and configures four firewall rules:
- Allow XYZ – App Load Balancer Security Group to access the App tier servers over HTTP 8080
- Deny all intra-tier communication for the App tier
- Deny all inter-tier communication from the Web and DB tiers
Finally, the XYZ – DB Security Policy applies to the XYZ – DB Security Group and configures four firewall rules:
- Allow XYZ – App Security Group to access the DB tier over MySQL (TCP 3306)
- Deny all intra-tier communication for the DB tier
- Deny all inter-tier communication from Web tier and App load balancer
Configure App Isolation
Enabling App Isolation for the blueprint ensures that a default policy isolates the deployment by creating an App Isolation Security Policy which applies some default firewall rules.
On-demand Security Group
To enable the global infrastructure rules, an on-demand Security Group is added to the blueprint and associated with the “Global” Security Policy, which defines the rules which will apply to all servers in the deployment. Different Security Policies could be used for particular environments (such as Production, Development etc.) or for specific Tenants or Business Groups.
Assigning Security Tags
The Security Tags that were pre-created for each tier are added to the blueprint: when VMs are deployed from each tier they will be tagged with the appropriate tag, and can be dynamically included into a Security Group.
Requirements met by OOTB NSX integration
When the blueprint is deployed by vRealize Automation, the following is configured:
- Five tier VMs are deployed (Figure 20)
- Each VM is tagged with their respective tier security tag
- An NSX Edge has been deployed, with two load balanced VIPs configured
- An IPSet has been created for each of the Load Balancer VIPs
- A unique deployment Security Group, and an App Isolation Security Group
- Each deployed VM is a static member of the new security groups
- Both IPSets are static members of the new security groups
- The firewall rules defined the Security Policies have been applied
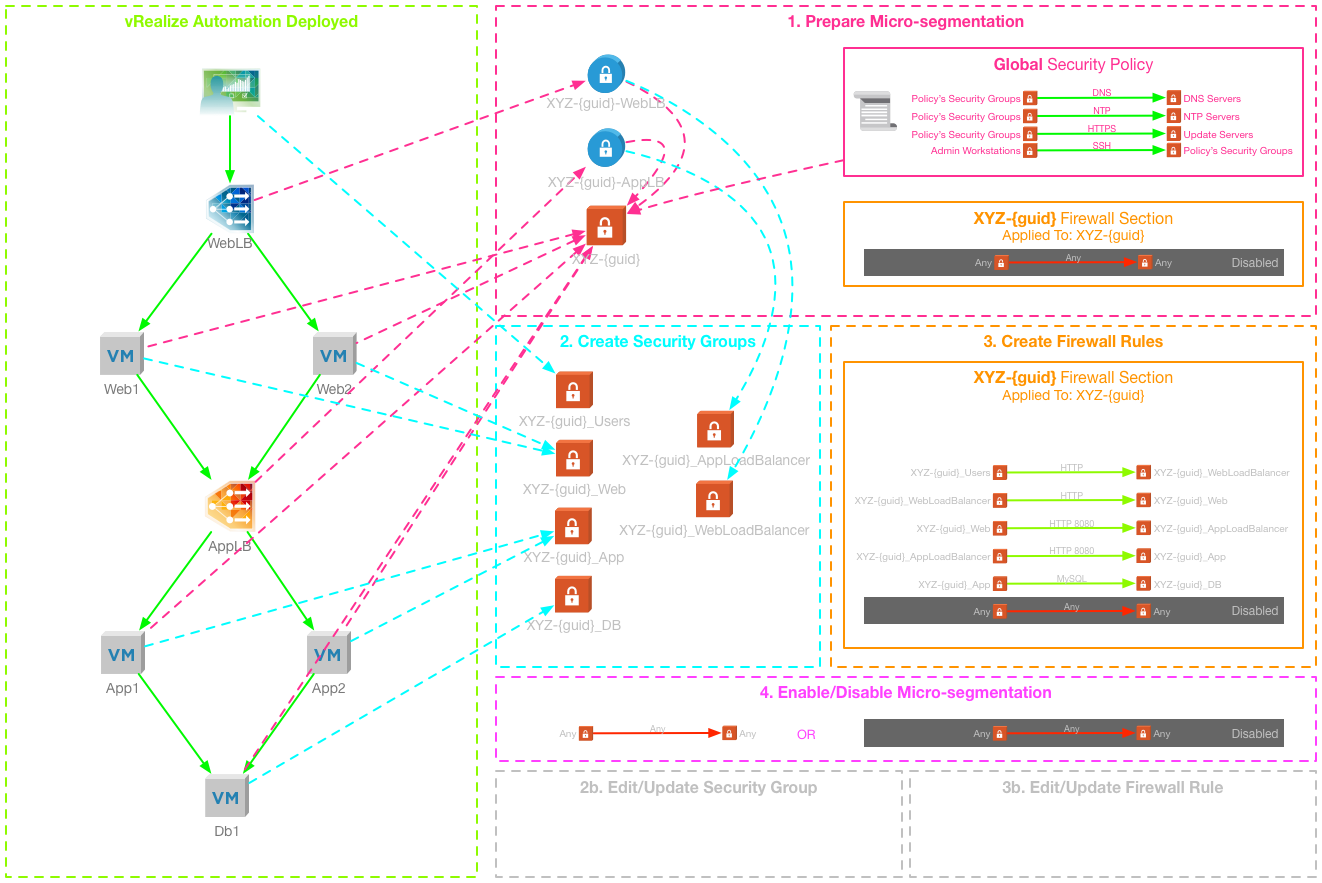
Manual/Automation steps to complete the solution
To complete the solution and meet the Application XYZ firewall requirements, the following step needs to be completed, either manually or through automation:
- The IPSets created for the Web Load Balancer and App Load Balancer need to be added to the respective Security Groups.
Caveat Emptor
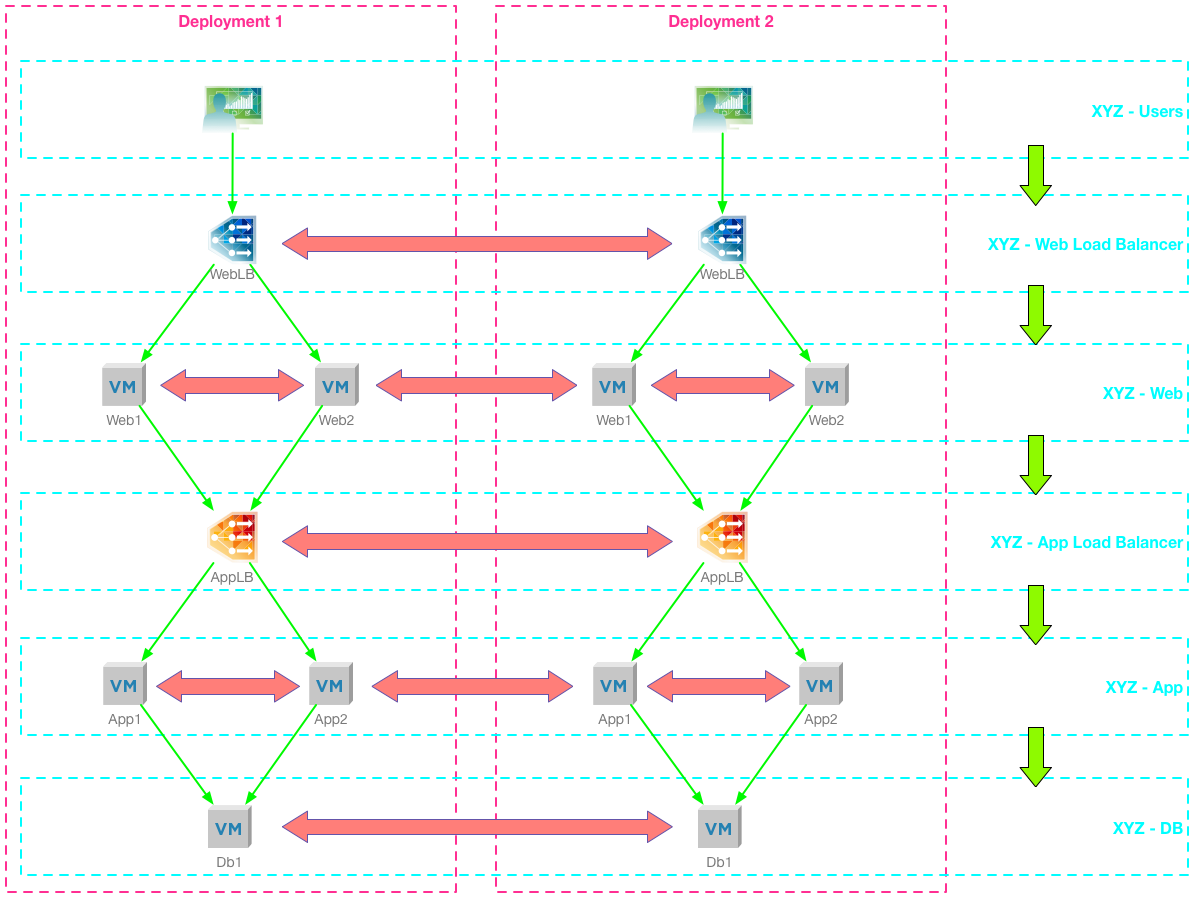
Using just the out of the box automation has an issue, allowed traffic between tiers is not segmented when the blueprint is deployed multiple times - strictly speaking it is not micro-segmented because there is nothing preventing, for example, the Web tier servers in Deployment 1 acccessing the App Load Balancer in Deployment 2. This can be easily mitigated using Edge Firewall, or additional Distributed Firewall rules, just not using the ”out-of-the-box” integrations.

Day-2 Micro-segmentation with vRealize Automation
Enabling micro-segmentation as a day 2 resource action assumes that the deployment does not have Security Groups or Tags applied as part of the blueprint. The firewall policy is then applied using a series of resource actions to configure the necessary Security Groups and Distributed Firewall Rules.
This approach has the advantage of being flexible, each deployment can be configured with unique firewall rules and those rules can be reconfigured at any point without affecting other deployments.
Implementing micro-segmentation with Resource Actions
The automation workflows detailed below would enable a “minimally viable product” for authorised end users to configure micro-segmentation for a deployment.
Configure Security Policy
A Security Policy needs to be manually created, with Firewall Rules defined to allow access to infrastructure services. To ensure that the firewall policies are placed above the rules deployed using resource actions, the Security Policy should be configured with a high weight (under Advanced Options).
Prepare Deployment for Micro-segmentation
This action sets up all of the components for the micro-segmentation.
- Creates an IPSet for all load balancer IPs
- Creates the deployment Security Group, and adds all VMs and load balancer IPSets
- Applies the selected Security Policy to the deployment Security Group
- Creates a Distributed Firewall Section to contain the deployment specific firewall rules
- Creates the “Default Deny” rule, but does not enable it
Create Security Groups
This action creates the application tier Security Groups and adds VMs - it’s run multiple times to create the required Security Groups
- Create a new Security Group
- Add selected VMs and Load Balancer IPs from the deployment to the Security Group
Create Firewall Rules
This action creates a new firewall rule at the top of the deployment’s distributed firewall section. It can be run many times to build up the rule sets and uses the Security Groups created by the previous workflow, as well as other pre-existing Security Groups.
- Create a new distributed firewall rule
Enable/Disable Micro-segmentation
This action toggles the default Deny rule between enabled and disabled.
- Update the default deny rule with the enabled flag
Additional Automation
In addition to the automation required for an MVP, the following functionality would be required to allow an end user to manage the micro-segmentation and enable “firewall-as-a-service”
Resource Actions
- Edit, Update and Delete a Security Group
- Edit, Update and Delete a Firewall Rule
- Create IPSets
- Remove Micro-segmentation
Scale in/out
In order to facilitate the scale in and out of deployments the Prepare Deployment for Micro-Segmentation workflow would need to be run again, this would ensure all components are added to the Deployment Security Group. In addition to this, the components would need to be added to the relevant application tier groups using the edit/update functionality described above.
Post destroy clean-up
Using the Event Broker to subscribe to the Deployment “Destroy” operation the “Remove Micro-segmentation” workflow can be triggered to clean up any created NSX objects before destroying the deployment.
Conclusions
The distributed firewall strategy should be applied consistently, whether it’s implemented at deploy-time through the vRealize Automation blueprint and XaaS components, or implemented as a day 2 actions. However, there are advantages and dis-advantages to both methods. There are undoubtedly many variations of these two strategies, and in reality a mixture of both are likely to be required. Careful planning and testing should be carried out to ensure the outcome matches the requirements.
Comparing “out of the box” and Day 2 micro-segmentation
Below is a non-exhausive comparison of some of the advantages and disadvantages of these methods.
<td width="308">
  <strong>Day 2 Resource Actions</strong>
</td>
<td width="308">
  Scale out resources must be manually added to the Security Group using the actions
</td>
<td width="308">
  Actions can be manually run at any time to reconfigure
</td>
<td width="308">
  Both new and existing deployments can be micro-segmented using the same method
</td>
<td width="308">
  Day 2 actions are simple to operate for end users
</td>
<td width="308">
  Authorised end users can modify firewall rules – additional process is required to audit changes (vRA Approval?)
</td>
<td width="308">
  Automation is required (e.g. using the Event Broker) to clean up the Distributed Firewall Section, Rules and Security Groups when the deployment is destroyed.
</td>
<td width="308">
  Micro-segmentation is configured on a per-deployment basis, so the actions must be run on each.
</td>
<td width="308">
  Can be written to use static inclusion which is more efficient at scale
</td>
<td width="308">
  Configuration is on a “per deployment” basis, so each deployment can have a unique ruleset.
</td>
Performance and Scale
There are performance and scale limitations that need to be considered when deciding on the micro-segmentation strategy – particular attention should be paid to the configuration maximums published for NSX 6.3 (
For example, with a single deployment of a single application blueprint the out-of-the-box method using Security Policies generates a lot more firewall rules than the Day 2 method. The Day 2 method will generate the same number of rules for every deployment and could quickly multiply. The out-of-the-box method only adds a single rule to the App Isolation policy for each subsequent deployment.

 Written by