Deploying to AWS with Software Components on vRealize Automation 7
Recently I’ve been working on some ideas in my lab to leverage the AWS endpoint on vRealize Automation. One of the things I needed to get working was getting Software Components working on my AWS deployed instances.
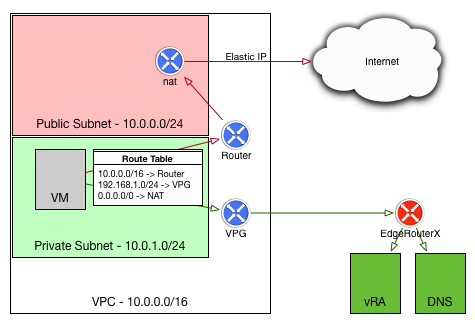
The diagram to the right shows my end-stage network - the instance deployed by vRA into AWS should be in a private subnet in my VPC, and should use my local lab DNS server and be able to access my vRA instance. This allows me to make use of the vRA guest agent for software components on the deployed VMs. I also wanted to have the deployed VMs use their local NAT gateway for internet traffic, rather than paying for the data over my VPN connection.
Configure a VPN connection
As I wrote in my previous article, the vRealize Automation Guest Agent requires a connection back to the vRealize Appliance in order to be able to receive tasks. Make sure you have a VPN connection configured and you can communicate back and forth with your internal network.
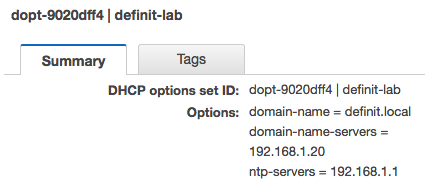
Create DHCP Option Set
A custom DHCP Option set allows you to specify the DNS domain name and DNS servers that are set by the DHCP server when handing out IPs to your Instance. It’s needed here because the vRA Guest Agent will need to use my lab DNS server to resolve my lab vRealize Automation deployment.
VPC -> DHCP Option Sets > Create DHCP options set

Assign DHCP Option Set to VPC
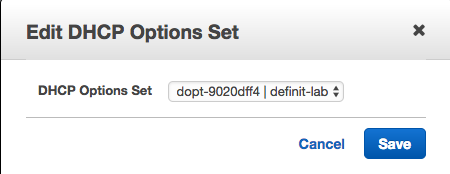
Assign the newly created DHCP option set to the VPC so that it’s used whenever an Instance is deployed.
VPC > Your VPCs > Action > Edit DHCP Options Set

Launch a new AMI and prepare for vRealize Automation
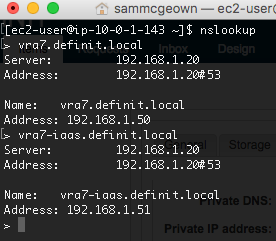
Test DNS resolution

Download and execute the template script:
wget --no-check-certificate https://vra7.definit.local/software/download/prepare_vra_template.sh
chmod +x prepare_vra_template.sh
sudo ./prepare_vra_template.sh
Follow the scripted install, making sure to pick ec2 as the cloud provider
One final step for RHEL6 is to remove the following line from /etc/sudoers. Without this any Software Component that uses a sudo command (e.g. sudo yum install something) will fail.
sed -i -e 's/Defaults requiretty.*/ #Defaults requiretty/g' /etc/sudoers
Create a custom AMI
Shutdown the AMI instance that was just configured and then from the Instance actions, select Image, Create Image.
Configure the Image
Check that the new AMI is available - EC2 > AMIs
Configure vRealize Automation
At this point the AMI should be collectable in vRealize Automation, so we need to trigger a data collection from the AWS Compute Resource:
Once that completes, create a new blueprint and drag in an Amazon Machine:
Configure the Reservation policy:
Switch to the Build Information tab and select a machine image. Use the filter to select private AMIs
Configure the key pair (not specified will use the reservation configured key), and select the instance types you want to be available.
To test the software component I don't need to configure the Machine Resources but we do need to set the osfamily custom property in the Properties tabs.
Drag a Software Component onto the Amazon Machine - I'm using a simple test one that writes custom text into a file in /tmp/text.txt:
Save, publish and entitle the new Blueprint.
Requesting the Amazon Blueprint
Select the instance type, and provision into values:
Select the subnet and a security group that will allow the AMI to talk back to the vRealize Automation appliance and manager service (I have recycled an existing one).
Once the request has been submitted, you can view the Execution Information to ensure the blueprint deployed successfully:
View the machine under the Items tab to get the IP address and export the SSH certificate to then connect to the VM. As you can see, the contents of the text.txt have been updated:


