Backing up ESXi 5.5 host configurations with vCenter Orchestrator (vCO) – Workflow design walkthrough
 As a little learning project, I thought I’d take on Simon’s previous post about backing up ESXi configurations and extend it to vCenter Orchestrator (vCO), and document how I go about building up a workflow. I’m learning more and more about vCO all the time, but I found it has a really steep entry point, and finding use cases is hard if you haven’t explored capabilities.
The steps I want to create in this post are:
- Right click host to trigger
- Sync and then back up the configuration to file
- Copy the file to a datastore, creating a folder based on date and the host
Ideas for future extensions of this workflow include - trigger from cluster/datastore/host folder, email notifications, emailing the backup files and backup config before triggering a VMware Update Manager remediation. Hopefully all this will come in future posts - for now, lets get stuck into the creation of this workflow.
Open your vCO administration web page, log in as “vmware” and the password you specified during deployment. Next move to the SSH plug-in configuration page and add your ESXi hosts.
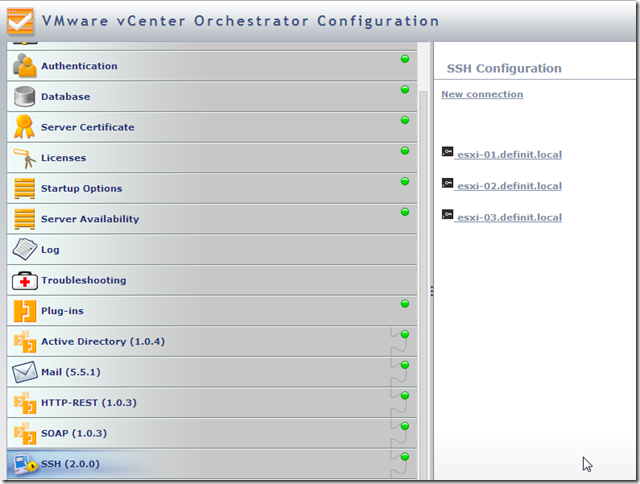
Open the vCenter Orchestrator Client, switch to the Design view and create a new folder to contain your workflows – mine is called “DefinIT”. Right click and create a new workflow, then name the workflow “DefinIT-Backup-ESXi-Config”. It will now open the workflow in edit mode.
Select the Schema tab and search for the SSH workflows. The one we are looking for is “Run SSH Command”. Drag that onto the workflow, between the start and end discs.
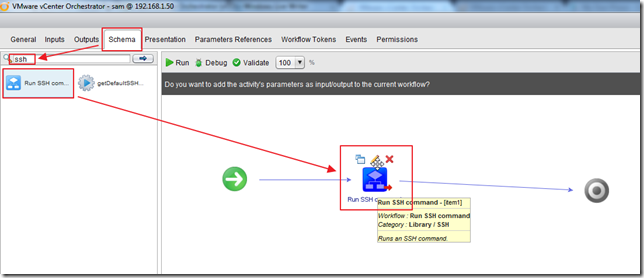
Click “Setup” on the grey question bar at the top of the screen to add the parameters to the workflow. This means that we can provide the required details from our workflow to the “Run SSH Command” workflow.
The two we want to specify a value for are “cmd” and “passwordAuthentication” – select value and then click the link to enter the values:
| cmd |
| passwordAuthentication |
The “cmd” value is taken from Backing up and restoring ESXi configuration using the vSphere Command-Line Interface and vSphere PowerCLI (2042141) – it ensures that any configuration changes are written to file and then backs that configuration up to a location on the installation disk (/scratch/download/
The passwordAuthentication parameter just specifies that we should use password based authentication for the SSH connection. We could use certificates, but that’s another day.
Set “path” and “passphrase” to Skip – this will skip adding the parameters to our Workflow (though they still exist as local parameters in the Run SSH Command workflow).
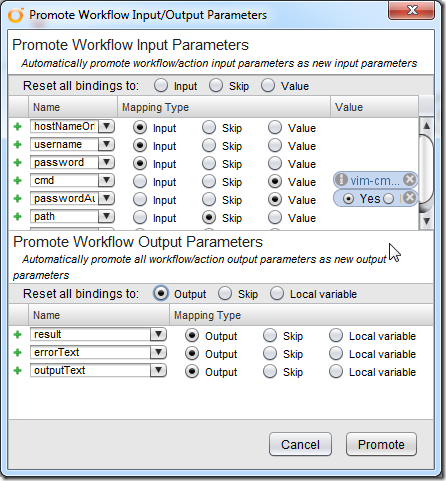
OK, so far so good, we’ve specified a default value for the cmd and passwordAuthentication parameters, skipped the path and passphrase and left the others as is. Click “Promote” and then select the “General” tab. You’ll see that the two parameters we specified have been created as attributes (bottom pane). Select the “Inputs” tab and you’ll see that the three “Run SSH Command” workflow parameters that we left as “Input” have been created as inputs for our workflow.


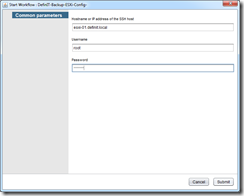
Jump back to the “Schema” tab and click on the “Validate” button – it should validate successfully. Now lets run our workflow – hit run and you’ll be presented with the three input parameters for our workflow – fill in the details of a test ESXi host, an admin user name and password and click submit.
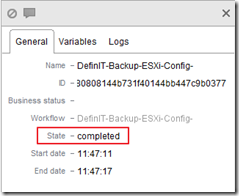
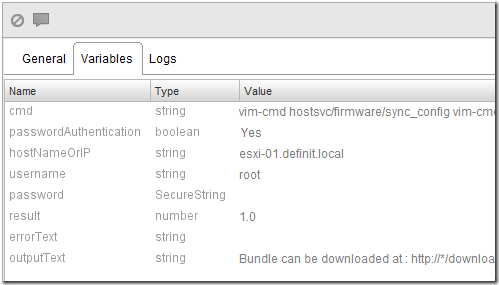
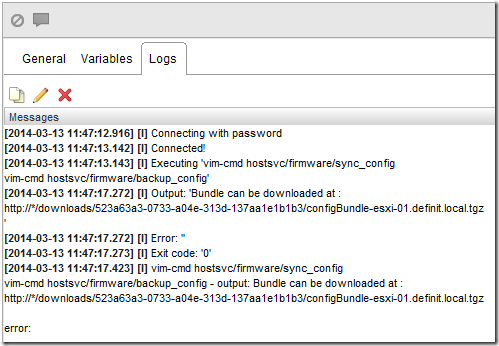
All being well the workflow will run and finish successfully. Have a look at the variables and the values the workflow has assigned them, they should look familiar! Jump to the Logs tab to see the output of the workflow.
Finally, double click on the “Run SSH Command” task and rename it to “Backup ESXi Config”.
So, step two from my original list is completed – tick! Step three is more complicated – we need to copy the file generated to a datastore so it’s backed up safely (the backup command only keeps the file for a few minutes). This is a little more complicated because we need to take the output of the first SSH command, manipulate it and copy the file to a datastore. We also need a new input – the target datastore.
The first step is to manipulate the output of the previous task – to do this we need a little scripting. As you can see from the “Variables” tab above, the value we want is part of a variable called “outputText”, which is a string.
Switch to the “Schema” view, find the “Scriptable Task” and drag it onto your workflow, between the Run SSH Command and the end block.

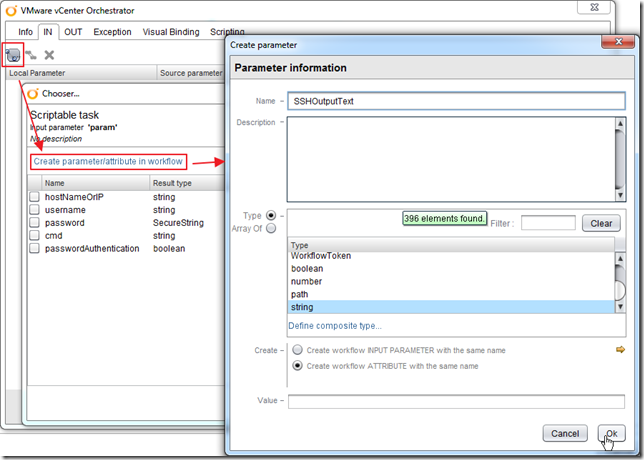
Select the scriptable task and click the little pencil to edit it. Rename the task to something appropriate – “Modify File Path”. Select the “IN” tab – notice there are no inputs for this task by default. Click the little “Bind to workflow parameter/attribute” button – this will show you our workflow’s parameters and attributes that are currently available. Click “Create parameter/attribute in workflow” and then name it “SSHOutputText”, enter a description “Text output from SSH workflow”, select the type “string” and ensure that we are creating an ATTRIBUTE with the same name, not an INPUT PARAMETER. Click OK to create.
Close the Script task for now.
The other requirement was for the user to select a Datastore on which to store the backup files. Given that we want a user input for this, we should make it an INPUT for our workflow. Switch to the INPUTS tab and click on the “Add parameter” button. The new parameter is called “arg_in_0” – click on the name to change it and call it “TargetDatastore”. Now, we could leave this as a string input for the user to enter each time, but that is prone to human error, and there’s a better way. Click on the “string” text to open up the type chooser, then find the type called VC:Datastore – use the search filter for speed! Accept that. Enter a description for the new parameter “Datastore to Export Host Configs”.
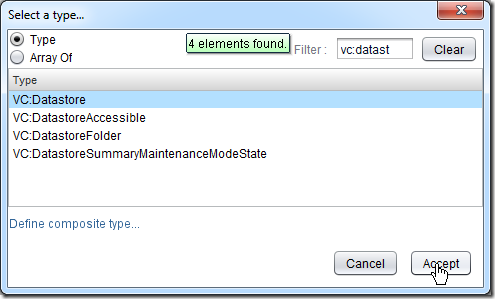
OK, so now we have a datastore (for which the user will be prompted at run-time) and an attribute to contain the output of our SSH backup command – lets start tying some parts together.
Edit the “Backup ESXi Config” task (select and use Ctrl-E, or click the pencil) and then select the “Visual Binding” tab. We can now pipe the value of “outputText” into the Attribute “SSHOutputText” by dragging the first over to the second to link them.
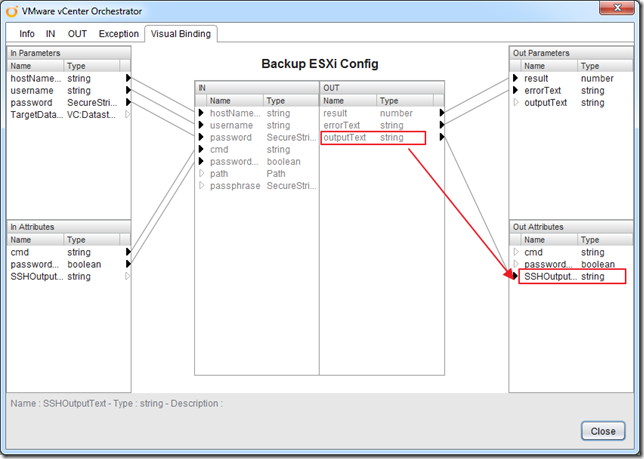
Now when the “Backup ESXi Config” task completes the value of outputText will be assigned to SSHOutputText, which is available in our workflow. Close “Backup ESXi Config”.
Edit the “Modify File Path” scriptable task and go to the “IN” tab. Click the link button again and select the TargetDatastore parameter to bind as an input. In the same way, add the hostNameOrIP parameter as an input.
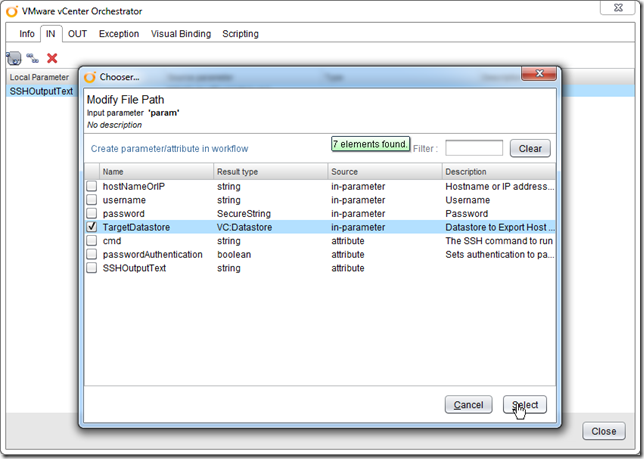
Switch to the “OUT” tab and add the “cmd” attribute – this will contain the command we generate in the script.

Switch to the Visual Binding tab and view how the inputs/outputs are bound to parameters and attributes. Inside “Modify File Path” we will have an attribute “SSHOutputText” (which was previously bound to the outputText of the Backup ESXi Config” task) and a parameter (which contains the Datastore object selected by the user). We also have the OUT attribute “cmd”, which will bind to the workflow attribute “cmd”.
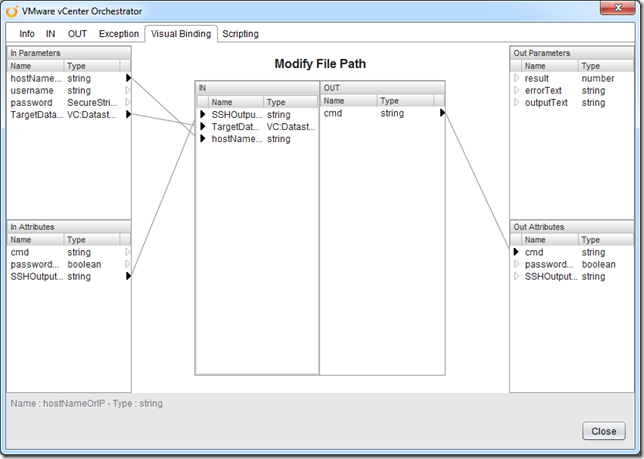
Now for a little JavaScript. Bear with me, I’ve not used JavaScript in years! Select the Scripting tab and you will see our parameters and attributes are handily listed at the top – they can be clicked to enter them into the script field.
This looks a bit complex, but essentially we’re just building a couple of Linux commands – a mkdir to create a directory and a “cp” to copy the file.
Firstly, create a new string “fp” to hold the file path. Using string.replace() we can strip out the text “Bundle can be downloaded at : http://*" from the SSHOutputText value, and then remove any line breaks. We then get the current date and build a string (df) in the format of “YYYY-MM-DD” to create a directory for each backup.
Finally, we build the command to create a directory structure in the chosen Datastore: /vmfs/volumes/
var fp = new String();
fp = (SSHOutputText.replace(“Bundle can be downloaded at : [http://*”,"")).replace(/(\r\n|\n|\r)/gm,"");][18]
d = new Date();
df = d.getFullYear()+"-"+(d.getMonth()+1)+"-"+d.getDate();
cmd = “mkdir -p /vmfs/volumes/” + TargetDatastore.Name + “/ConfigBackups/” + hostNameOrIP + “/” + df + “; cp -f /scratch” + fp + " /vmfs/volumes/" + TargetDatastore.Name + “/ConfigBackups/” + hostNameOrIP + “/” + df + “/”
System.log(cmd)
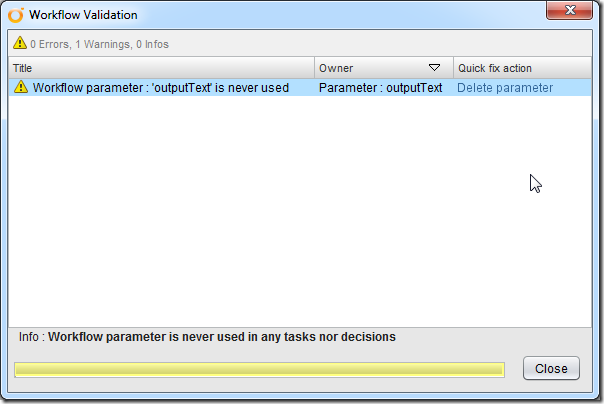
Now switch to Schema view and validate the workflow – this will throw an error this time because we mapped the “outputText” parameter to the “SSHOutputText” attribute, leaving the parameter unused. Click “Delete parameter”.
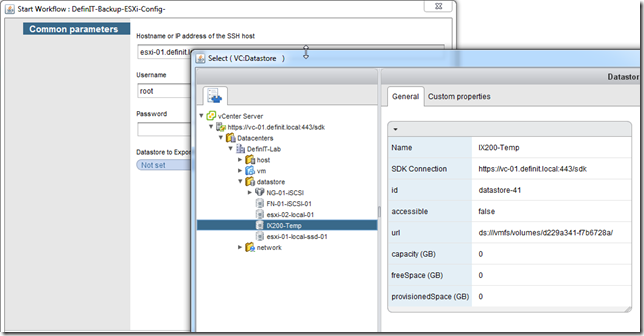
Lets run the workflow and see what we get. Notice this time we have the Datastore selection, and we can actually pick that from our vCenter inventory.
And, although nothing new happened, we have some new log output (thanks to our System.log command). Look at the command that was generated:
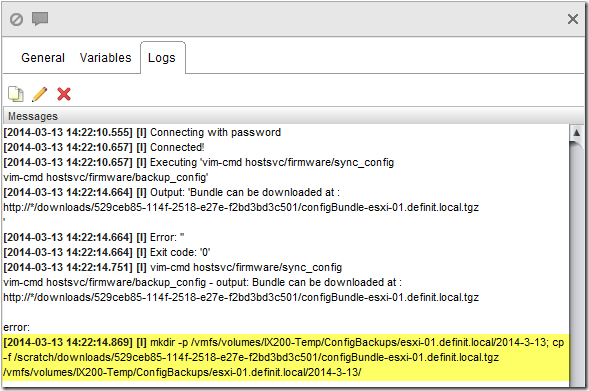
Perfect – we can move on to executing that command with another “Run SSH Command” task – so jump over to Schema view and drag it in after the “Modify File Path” script element. This time we don’t want to “promote” the SSH command task’s inputs as we already have parameters set for them. Edit the task and name it “Create folder and copy file”. Switch to the Visual Binding view to link up the inputs, and outputs to the attributes and parameters:
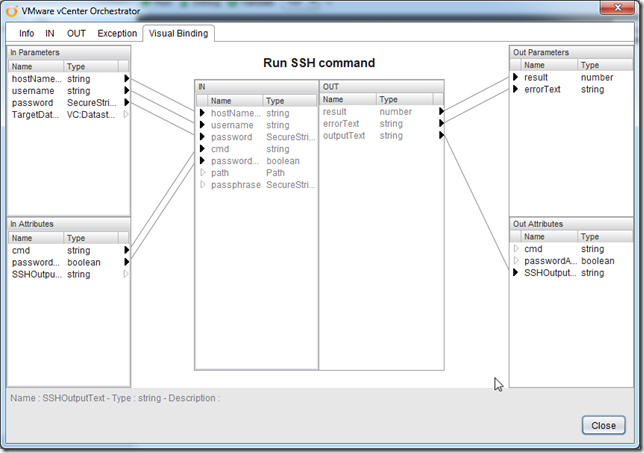
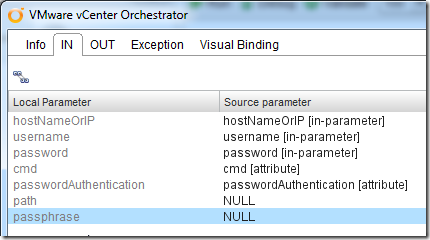
Here we reuse the hostName, username, password, passwordAuthentication from our first SSH command task and the cmd attribute which was re-used in the Script task and contains our new command. Output wise we re-use the SSHOutputText attribute to contain the outputText of the SSH task. The last two parameters (path and passphrase) need to be bound to a NULL value otherwise our validation will fail – this is done by going to the “IN” tab and setting the Source parameter to NULL
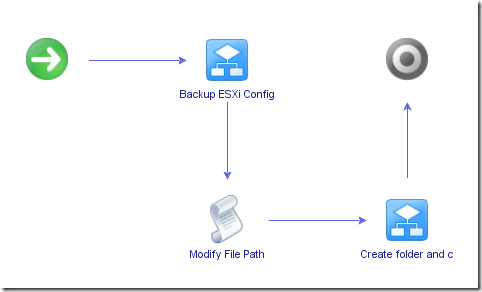
My workflow now looks like this:
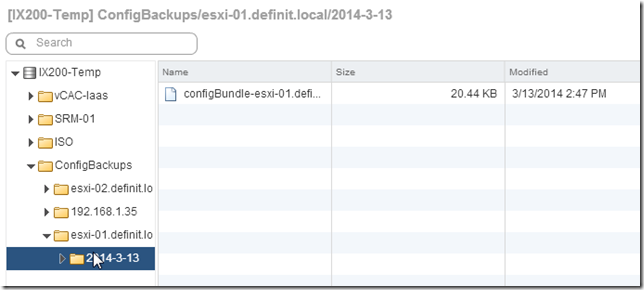
Now run the workflow and check the Datastore specified for the folder structure and backup file
This is cool, but at the moment we are not right-clicking a host in the Web Client, we’re running it from a vCO client. Binding this workflow to hosts is actually really easy, but at the moment we’d still have to manually type the name of the host into the form to make it usable. It’d be better to populate it from the host we’re clicking right?
Go to the INPUTS tab and add a new parameter named “Host” and add a description “Host to back up”. Change the type from string to VC:HostSystem from the type picker:
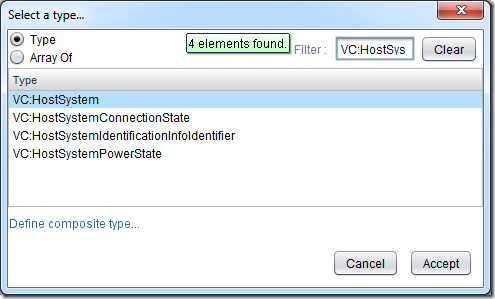
Use the up arrow to move the new parameter to the top of the list. Select the hostNameOrIP parameter and click the “Move as attribute” button.
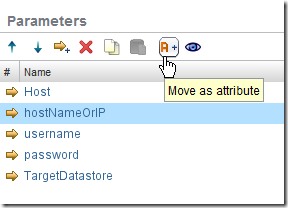
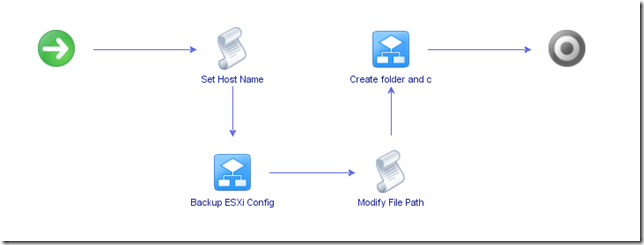
Now we’ve properly broken the workflow – all the elements used the hostNameOrIP as an input parameter! 🙂 Switch to the Schema tab and drag a new Scriptable task before the first SSH task – name it “Set Host Name”. Edit the task and go to the Visual Binding tab. Drag the parameter “Host” to the “IN” field – this creates a task parameter of Host and binds the value of the workflow parameter host to it. Drag the Out Attributes “hostNameOrIP” attribute to the “OUT” field – this creates an out attribute for the task and binds it to the workflow attribute.
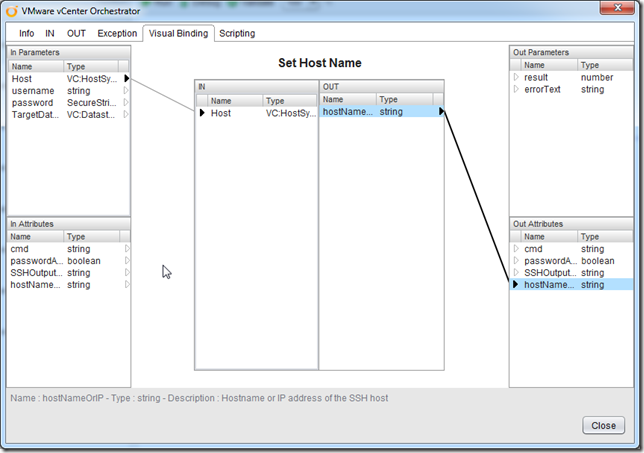
Switch to the Scripting tab and enter one simple line to select the “name” property of the VC:HostSystem object and assign it to the hostNameOrIP attribute.
hostNameOrIP = Host.name
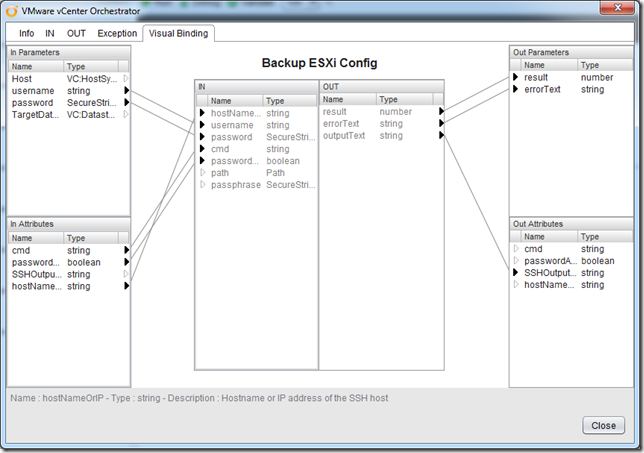
Close the scriptable task and move on to each of the workflow tasks (Backup ESXi Config, Modify File Path and Create Folder and Copy), opening the Visual Binding tabs and dragging the “hostNameOrIP” attribute to the tasks’ “hostNameOrIP” IN property:
My workflow now looks like this:
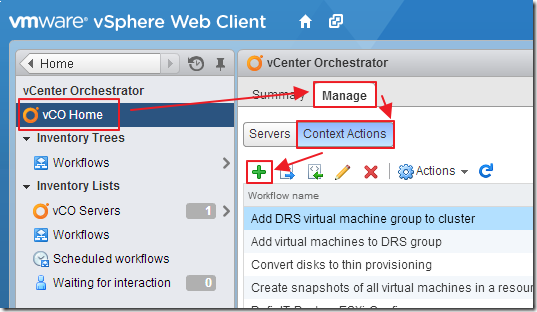
The workflow should now validate – but don’t run it yet. Log on to your vSphere Web Client and go to the vCenter Orchestrator inventory page. Select the top level vCO Home, then in the right hand pane click on Manage and select Context Actions and click the plus sign.
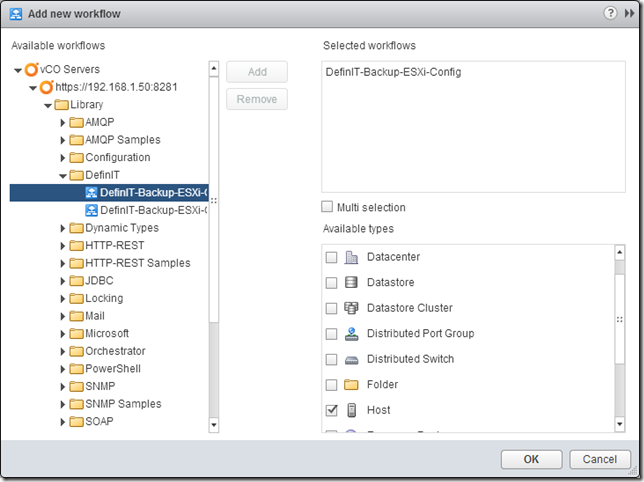
Now find the workflow in the Available Workflows section and click Add. Then find “Host” in the Available types pane and ensure it’s checked. Click ok and then switch to your Hosts and Clusters view.
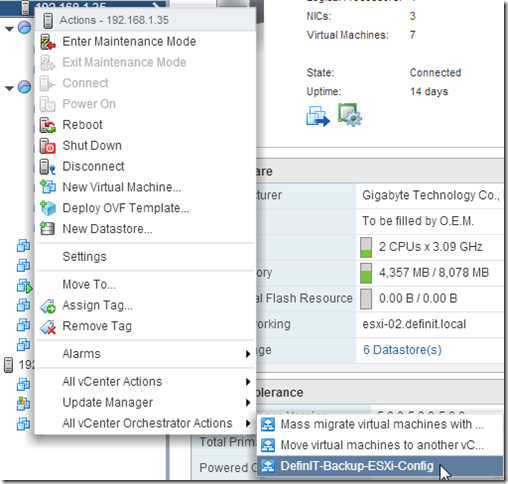
Now select a host and right click (wait a few seconds for the context menu to build) and you will see the Orchestrator actions, and the workflow are available.
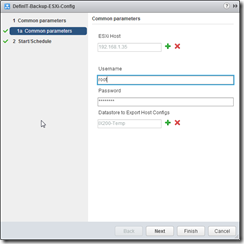
The ESXi Host field is now pre-populated with the host we just clicked on – you can run the whole workflow again if you want, or cancel out and head back to the Orchestrator Client for the final task.
[18]: http://*","")).replace(/(\r\n|\n|\r)/gm,""); [19]: /images/2014/03/image98.png [20]: /images/2014/03/image99.png [21]: /images/2014/03/image100.png [22]: /images/2014/03/image101.png [23]: /images/2014/03/image102.png [24]: /images/2014/03/image103.png [25]: /images/2014/03/image104.png [26]: /images/2014/03/image105.png [27]: /images/2014/03/image106.png [28]: /images/2014/03/image107.png [29]: /images/2014/03/image108.png [30]: /images/2014/03/image109.png [31]: /images/2014/03/image110.png [32]: /images/2014/03/image111.png [33]: /images/2014/03/image112.png [34]: /images/2014/03/image113.png

