
 There’s no doubt that vCOps is a great product for proactively monitoring your vSphere environment, but it’s a hefty package for the lab. The minimum recommended RAM is a whopping 16GB – in my lab that’s the whole of my management host! I recently needed to do some testing so I wanted to get it running in the lab with the barest minimum I could get working, and it turns out you can get working with just 4GB and 2 CPU…albeit you wouldn’t want to monitor much! I also want to use vFlash Read Cache to accelerate I/O in the lab – this requires upgrading VMtools and the VM hardware to version 10.
Bear in mind that this is a lab install, and production environments should follow the recommended minimums and configurations!
Preparing to install#
If you’re using DHCP in your lab environment then you don’t actually need to set up an IP pool – I’m going down that route, but just for completeness, here’s how you do it.
|
|
|


Other vCOps pre-requisites are pretty basic, enough disk space (344GB) – I’m thin provisioning as it’s in the Lab, so I’m not overly concerned about that. For a small deployment the VMware minimum RAM requirement is a whopping 16GB – that’s more than I can spare, so I’m going to configure this for just 4GB once it’s deployed. Similarly, even the small environment requires 2 vCPUs per VM – I’ll drop it to 1 when the vApp is deployed.
Deploying the OVF#
Deploying an appliance in the form of an OVF is dead simple – as it should be!

Browse to select the downloaded OVA template and select it.

Review the details of the vApp - note the thin and thick provisioned sizes

Accept the EULA

Name the vApp (I just left the default) and select the Datacenter to which you want to deploy vCOps

Select the size of deployment you required - this will automatically set the RAM and CPU of the VMs to the recommended levels. Each size tells you the recommended size to monitor, as well as the RAM and CPUs required.

Select the host or cluster that you wish to run the vApp on

Select the storage you want to use, and whether you want to thick or thin provision the disks. I am using thin provision on my NFS silver datastore.

Select the network you're going to use, and how you will allocate IPs to the VM. I am using DHCP to allocate IPs in my lab.

Set the timezone for your VMs

Review and finish the wizard - but don't power on at this point!
Once deployed I selected each VM in turn and reduced the memory to 2GB and CPUs to 1 – this is the same as you would do for any other VM, edit the settings and decrease each.
Powering On and Configuring the vApp#
You can just power on the vApp using the vApp actions, and if you’ve given the vApp enough resources I’d say that’s definitely the way to go about it…
…unfortunately I’ve only given a fraction of the recommended RAM, so I’ll power on the Analytics VM first (ignoring the warning about it being part of a vApp) and then wait for it to be 100% guaranteed up – I gave it a good 20 minutes. Then I powered on the UI VM – this seems to avoid the problem I encountered where the UI VM displays
trust.sh: failed to setup trust to AnalyticsIP
and
VMware vCenter Operations Manager - versionNumber Build buildNumber has encountered one or more unrecoverable errors during the initialization of the application. This deployment cannot be recovered and must be discarded
There’s a fix documented under KB2019544, but unfortunately it doesn’t work for vCOps 5.8 – in the end I had to redeploy the vApp. Powering on the VMs one at a time, with plenty of boot time in between seems to resolve the issue, which I think was caused by the Analytics VM not being ready to communicate when the UI VM ran it’s initialisation script. I haven’t had a problem powering on the vApp the normal way after the initialisation has completed.

Powering on the vApp
Probably unsupported…but so’s the rest of my Lab!#
At this point I wanted to update the VMtools version for the two deployed VMs – post vSphere 5.1 there’s no reboot requirement for VMtools updates, so I went ahead and hit the update tools link and selected automatic update.

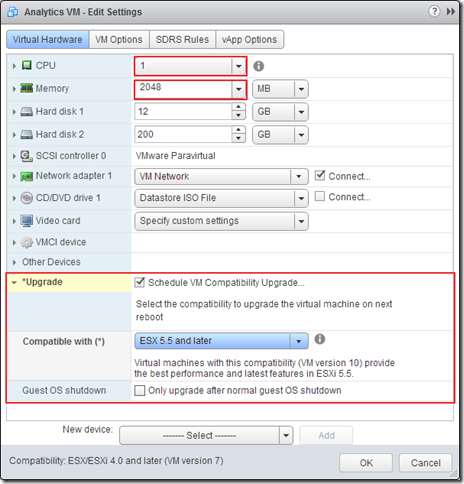
That takes a couple of minutes to complete, once that’s done I went on to update the VM hardware. Shut down the vApp and wait for both machines to fully power off. This isn’t necessary, but I’m using a local SSD as vFlash Read Cache so an upgrade to VM hardware v10 is required. Just tick the “Schedule VM Compatibility Upgrade…” box and it’ll do it on first boot.
Now, boot everything back up and you *should* get to the stage where you can begin configuring vCOps!
Initial Configuration#
Open your browser of choice and point it the the UI VM’s IP address using https (e.g https://192.16 8.1.117/) – you should be able to log into the appliance’s admin console using the default username (admin) and password (admin)

You should be able to use the hosting vCenter Server details checkbox here - it wouldn't let me advance, so I unticked that and filled in the IP of the Analytics VM manually

Enter the default password for the admin account "admin" and a new complex password. Enter the default password for the root account "vmware" and a new complex password.

Enter a display name, the vCenter server (FQDN is preferred) and a registration user for accessing the vCenter. Optionally set a collector user (with a more limited access set) for the data collection.

Check the vCenter Server's certificate matches with the one on your vCenter using the thumbprint, and click yes.

Nothing to see here, no plugins detected!

No linked vCenter servers either…

Once the wizard has completed you should be presented with the administration console. Note that the vCenter Server has been registered.
At this point the VMs are running fairly responsively, and granted they are not doing a lot of work, but it shows that you can actually run a vCOps instance with 4GB RAM and 2 vCPUs:

Licensing vCOps#

To assign a license to vCOps you need to go to the Licenses page under Administration, then select the Solutions tab. Select your vCOps instance and then click “Assign License Key…”
Now with my license installed I can see not just Environment, Operations and Alerts but the full set of tabs:
